Creating your own DBpedia

In this first part I will show you how to extract RDF from Wikipedia with the help of the DBpedia Extraction Framework. In future version we are going to import this data into Virtuoso and create a Solr/Lucene Index for it.

First of all you need to install Java 7, Scala, Mercurial and Maven. Then open a Terminal and go to the directory where you want to install the extraction framework. Then you can checkout the DBpedia Extraction Framework from here (this is one line!):

$ hg clone http://dbpedia.hg.sourceforge.net:8000/hgroot/dbpedia/extraction_framework dbpedia-extraction

If this is done go to a command line and enter:

$ cd /path/to/mercurialrepo/dbpedia-extraction
$ mvn install
$ cd dump

Once this is done you need to edit the config files according to your needs. First we need to configure what we want to download. You can download this config file and adjust it. Now we need to configure what we want to extract. Here are two config files which work for English and German. I’ve only activated some of the Extractors, a full list can be found here. Also make sure that you have only “extractor.$Language_Code” entries for languages you want to extract. Otherwise you will get error message for trying to extract from non existing data. The last thing to edit is the pom.xml in the dump directory. Go to the download launcher in the pom file and adjust the name of you config file (no need for change if you use the config I supplied). Then go to the extraction launcher and also change the name of the configuration file according to your needs. Now you should be able to start the download via:

$ mvn mvn scala:run -Dlauncher=download

and run the extraction with:

$ mvn scala:run -Dlauncher=extraction

The data directory specified in the German and English config files should now contain several files n-triples or turtle files. Congratulations! If anything  went wrong please drop me a comment!

1 Comment

Filed under DBpedia, Development

Tailing log files in eclipse

I used to tail my log files in the console/terminal with “$ tail -f somelog.log”. But this is not really working if you have Eclipse in fullscreen mode (in Mac OS X). I recently stumbled across a very nice plugin, which basically let’s you do the same thing in a “Window-View” just like the Console- or Outline view of Eclipse. The plugin supports also multiple log files, so you can easily switch between a debug an normal log file. Furthermore you can define some rules (word or regex-match) which then can, if they match, change the particular line’s back- and foreground color…  exceptions can’t hide 🙂 To install this extension copy the following URL and go to Eclipse > Help > Install new Software and install the “Log Viewer Feature”. Restart eclipse and open the Log Viewer with Window > Show View > Other > Log Viewer. You then need to add all the log files you want to tail and create your custom rules (see picture for more infos). Please also visit and star this project on it’s Google Code site.

1 Comment

Filed under Development, Eclipse, Uncategorized

Recently Used Files and Folders in Finder

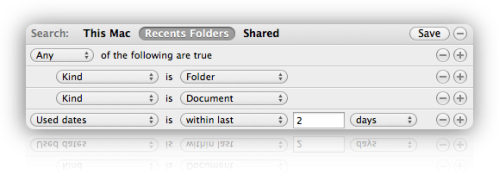
Have you every heard of the Mac OS X feature called Smart Folder? That’s the feature we are going to use for creating a folder which displays the recently used files and folders in the Finder sidebar. All you need to do is the following:

  1. Make sure your are in the directory you want to create the Smart Folder for (the Smart Folder is applied to this and all subfolders)
  2. Go to Finder and click on File -> New Smart Folder
  3. Then click on the little plus (+) button on the top right
  4. In the first drop down box go to Other and checkmark Used dates, Click OK
  5. Select the something like: Used dates is within last X days (according to your favor)
  6. Now hold down the Alt key ⌥  (the +-button should become a …-button) and click it
  7. Now make sure that Any is selected in the new filter criteria (not All/None)
  8. And create two new sub criteria one for Kind is Document and one for Kind is Folder
  9. Click the Save button and name it as you wish, drag it at the desired place in the sidebar
  10. Enjoy!

Of course you can adjust this as you wish to only show PDFs which are greater than 12MB and are labeled yellow, contain the word “stupid” and are located in the Document directory. I think you get the drift. Also, you can always rearrange the filter criteria by right-clicking on the folder and selecting Show Search Criteria. The same goes for renaming the folder.

An example of a Recently Used Smart Folder

1 Comment

Filed under Finder, Mac OS X Software

Re-Download Mac OS X Lion

Since there is no simple download button on the Apple website and there are no install DVDs available, reinstalling Lion might seem tricky. But you can re-download it from the Mac App Store.

  1. Open the Mac App Store
  2. Press Option Key (alt/⌥) and keep it pressed for some seconds
  3. While clicking on Purchased
You might also want to have a look at how to create a bootable USB drive here.

Leave a comment

Filed under Mac OS X Software

A very cute whale

Leave a comment

Filed under Fun

Recover lost files on your mac … for free

I have recently been to the Zoo and took a lot of pictures. As lazy as I am, I didn’t immediatly copied the files to my laptop after getting home. As a friend of mine wanted to rent the SD-card after some time, I decided to take a _quick_ look on the pictures but I couldn’t find any picture not yet imported to the library. And so it happened, i formatted my SD-Card containing all my cute little animals. I tried some demo-commercial software to recover the files with success, but recovered pictures with the company logo was not what I was looking for. I finally stumble upon PhotoRec a free and open source tool for virtually any operation system. You can get a copy here. It’s a very simple command line tool with a step-by-step tutorial. It recovered all my files within minutes. So please give it a try!

1 Comment

Filed under Mac OS X Software, Photography

Change iCal and Address Book skin

Lion brings a new look to the Address Book and iCal. Since I’m not a real fan of the new skin, I was glad to hear that a little tool from 16-year old developer Fredrik W. called Lion Tweaks, is able to change it to the regular Apple Aluminum look. You can grab a copy here or download it directly from here. There are a lot more tweaks inside this tool, so see please check it out!

3 Comments

Filed under Mac OS X Software

Using Eclipse in Fullscreen Mode under Mac OS X 10.7 Lion

Since the recent OS update enabled fullscreen applications, all I wanted to do was using Eclipse in Fullscreen mode. But since the most recent eclipse release does not support this feature it seemed impossible. But now Alex Blewitt came to the rescue. In his recent blog post he describes what is necessary to make eclipse fullscreen compatible.  So go ahead and read it here or open Eclipse > Install New Software > Add “http://github.bandlem.com/” and install the extension. Thanks Alex!

via http://alblue.bandlem.com/2011/07/full-screen-support-for-eclipse-on-osx.html

via http://www.heise.de/mac-and-i/meldung/Eclipse-im-Fullscreen-Modus-von-Mac-OS-X-Lion-1284824.html

15 Comments

Filed under Development, Eclipse, Mac OS X Software

Analyze your music (listening habits) in iTunes

I stumble upon a great tool to analyze your iTunes library. It’s called SuperAnalyzer by the guys of nosleep.net. It’s written in Java and therefore platform independent (Mac OS X & Windows) and even open source under a GPL license, so you can add your own statistics there. Go get it! Here are some if its features:

  1. show the growth rate of your library
  2. how much songs are rated
  3. # of songs per genre/year
  4. listening times
  5. quality
  6. most played artists/genres/albums/songs
  7. all sorts of play counts
  8. most frequent song title names
  9. export statistics to pdf or html
  10. many more!!

1 Comment

Filed under iTunes, Mac OS X Software, Music